StampArtist

A blog for sharing rubber stamps and stamping ideas and inspiration! I love stamping and scrapbooking. I love The Angel Company's stamps, papers, and embellishments! So, this is my little space to post my creations in a gallery. They are listed by set. Hopefully you'll enjoy your time here and come back often!

2.26.2007

More Cards Added

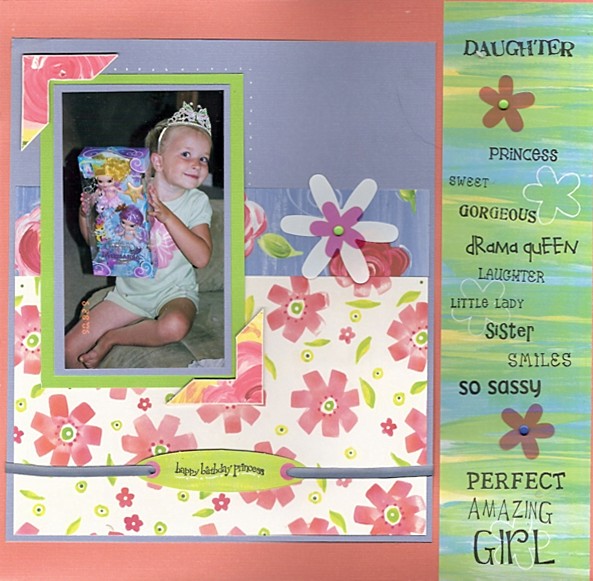
I have a few new cards I am putting in the gallery. I have been playing with some of the papers from My Mind's Eye this week. I love them! Here is one of the samples I did. 
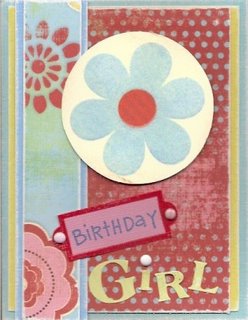
Cardstock: Die Cuts With A View
Letter stickers: Basic Grey
Flower accent:My Mind's Eye
The label holder and "Birthday"stamps: The Angel Company
Brads:Queen & Co.
Embossing Powder: Ranger
Ink: Palette Ink

2.21.2007

Latest Design


I was playing last night with some chipboard and made this card. Had to share it, it was so much fun! The paper is Daisy D's and so is the flower chipboard. The flowers and brads on top are from TAC.

2.18.2007

New Sketches!

I decided I'd start throwing some sketches out here for you. I have just taken them from my own designs. If they resemble any others it is just coincidence. And it wouldn't totally surprise me! Let me know if you enjoy them. I will add sketch links in a few days on the side bar. so, here is your first one:

2.16.2007

Tutorial: Watercolor Painting

I have a tutorial for you this week! I love watercolors so I thought I'd do a tutorial on using them to color in your images.

*Using the Noir (or black craft ink) ink stamp the lighthouse onto Cold Press watercolor paper. Be sure to apply good pressure since the Cold Press has some texture to it. Allow the ink to dry completely.
*Dip a #2 Flat brush into clean water and apply water to the sky areas around the lighthouse. (you may need a different size brush depending on the size of the image you are using!)
*Dip the paint brush back into clean water and then put it into the light blue paint. After picking up some of the paint onto your brush put the paint onto a paint tray or styrofoam plate so that it can be mixed. Dip the brush back into the water and then into the gray paint. Mix the gray and light blue paint together to form a cloudy sky gray. Apply this mixture onto the wet areas of the picture. Start in the areas along the shoreline and along the lighthouse. Spread the paint outward into the sky. This gives you a darker color along the areas where you first apply the paint. Allow the paint to dry completely. You can speed the drying process up with a heat gun, but hold it a little farther away so you don't blow the color to a different spot!
*Now apply clean water to the lower portion of the sky. Dip the paint brush back into clean water and then put it into the cobalt blue paint. After picking up some of the paint onto your brush apply this sparingly onto the wet areas of the picture. Start in the areas along the shoreline and along the lighthouse. Spread the paint outward into the sky. Use random curvy strokes to achieve a more cloud-like appearance. Allow this to dry somewhat- but not all of the way. Using a facial tissue blot the paint. This will lift some of the paint off and create a more cloud-like appearance. Allow the paint to dry completely.
*Apply clean water along the shoreline and just a little ways up the lighthouse (mostly at the edges of these spots and not out into the sky much at all). Dip the paint brush back into clean water and then put it into the marine blue paint. After picking up some of the paint onto your brush put the paint onto the paint tray. Dip the brush back into the water and then into the gray paint. Mix the gray and marine blue paint together, the gray will tone the marine blue down just slightly. Dip the brush into clean water and then into the burnt umber. Mix a small amount of the burnt umber into the blue/gray mix. This will darken it somewhat. Apply this mixture onto the wet areas of the picture. Use the brush to run along those shoreline edges and the lower portions of the lighthouse. Allow the paint to blend into the cobalt blue to blend. Use a little more water if necessary to create the blended effect. If the color is too dark use a tissue to lightly blot until you like the color. Allow the paint to dry completely.
*Apply clean water to the grassy areas and the shaded areas on the lighthouse. Dip the paint brush back into clean water and then put it into the raw umber paint. After picking up some of the paint onto your brush apply this to the wet areas of the picture. Follow the curves of the hills on the grass. On the lighthouse begin with the paint in the shadows and blend downward. Apply just a bit to the bottom steps of the lighthouse. Allow the paint to dry completely.
*Apply clean water to the grassy areas. Pick up some lime green paint onto your brush. Apply this paint to the grass going right over the raw umber. Blot with a tissue randomly and very lightly.
*Using a #00 Round Brush apply clean water to the birds in the shaded areas. Pick up a small amount of gray paint and apply to those areas. Repeat this with a touch of yellow ochre to add highlighted areas around the gray.
*Using the round brush re-wet the marine blue mixture if you had some left (if not just get more!). Very lightly run the brush along the two center lines on the lighthouse and under the railing in the shadows to create a little shading and depth. If it is too dark- add more water to thin it and blot with a tissue if necessary.
*Apply water to the shaded sides of the lighthouse using the flat brush. Apply yellow ochre paint to those areas.
*Apply a touch of navy paint to the rooftop, left side of the lighthouse and under the railing in the shadows.
*Rewet the upper sky. Mix gray, white and light blue together and apply the mixture to the wet areas of the sky. Blot with a tissue randomly to create cloud shapes if desired.
Using the round brush and a touch of black paint (very diluted with water) apply black paint to the shadowed and shaded areas of the image (under the railing, the left side of the lighthouse and the rooftop).

2.14.2007

New stuff in the gallery!

I got a load of new things into the gallery! I added some layouts as well- I am going to mark the layouts with a " *LO* before the stamp set name, just to make it more confusing! I have a batch of cards and a project waiting in the wings, but they won't be loaded until March. So I will keep on stamping and see what else I can get in before then!

Here is one of the cards


and LOs I added:


I gotta run! Have a great Valentine's!
Well, I am finally adding some new cards to the gallery! I have had them done but hadn't scanned them. So, I got that taken care of last night and will get them into the list today. Then if things go really amazingly well I will get a project loaded! I have just had no extra time lately. So, I will get to that as soon as I can!

To subscribe to my blog- Enter your Email! You will be notified when I add pictures to the gallery!


Preview | Powered by FeedBlitz

2.06.2007

Getting Behind

Well, life is catching up to me. Actually I feel like I am chasing a speeding train this week. Is it really only Tuesday- and not last Tuesday? Yikes! I have a few projects in the works, but I am not ready to load them yet. I am going to focus on that tonight if all goes well! I have been putting in a lot of time on our "real" business, this is a must in the Spring. But it leaves me either drained mentally or irritated. Depends on how things went, no broken printers or running out of supplies in the middle of something. I am sure you understand. So, I feel like I have put in more than enough hours today. I am going to vacuum (so I won't feel guilty later) and then I will see if I can get the projects finished!


To subscribe to my blog- Enter your Email! You will be notified when I add pictures to the gallery!


Preview | Powered by FeedBlitz