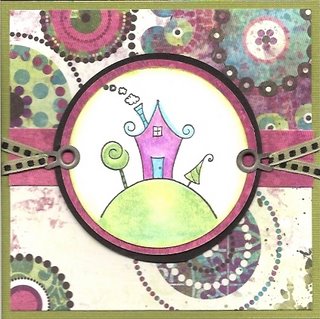
Tutorial: Prismacolor Colored Pencils & Mineral Spirits!

This is my favorite technique. I use it more than any other. I love the smoothness of the color blending and the way it resembles a great painting! Go ahead and give it a try!
Road To A Friend’s Card
Designed by April Staker
Supplies (from TAC™):
R2015 Road To A Friend’s Stamp Set
V222 White Ultrasmooth Cardstock
V98 Green #1 Cardstock
V852 Genevieve Cardstocks
V215 Black Cardstock
TT220 Noir Palette Hybrid Ink Pad
S960 Tea Leaves VersaMagic Ink Pad
F18 Prismacolor Colored Pencils: Chartreuse, Limepeel, Olive Green, Process Red, Mulberry, Light Aqua, Dahlia Purple, Aquamarine and Dark Green
G765 Celery Ribbon
F932 Nickel Loopy Eyelets
Your Preferred Circle Cutter: You could also use the Coluzzle Template, or the Super & Mega Circle Punches
Odorless Mineral Spirits (available at craft/art stores)
Blending Stumps (available at craft/art stores)
Instructions:
1. Cut White Cardstock to 8½” x 4¼”, score at 4¼” for the card.
2. Cut Green #1 Cardstock to 4¼” x 4¼”.
3. Cut Circle Pattern Cardstock to 4” x 4”.
4. Cut White Cardstock to a 2¼” wide circle. Run the edges across your Tea Leaves ink pad.
5. Cut Magenta Cardstock to a 2½” circle.
6. Cut Black Cardstock to a 2¾” circle.
7. Cut Magenta Cardstock to ¾” x 4”.
8. Stamp the image in Noir ink onto the White circle.
9. To color your image apply the colors as follows:
Chartreuse- color in the grass area
Limepeel- shade the grass and color in the trees
Olive Green- shade the trees (follow along the lines)
Process Red- color in the house
Mulberry- shade the house
Dahlia Purple- add more shading on the house
Light Aqua- color the door, chimney and trace the roof line
Aquamarine- shade the door and chimney
Dark Green- shade the trees and more shading on the grass
10. To use blending stumps: You will want one stump per color family so that the colors don’t get mixed and muddy. Start with the lightest color in the lightest area. Dip the end of the stump in the mineral spirits for a few seconds. Hold it up to let the liquid be absorbed before you apply it to the image. To blend the colors place the stump in a light area of the color you are working with. Making circular motions rub the blender around on the colored area until the lines have softened and it looks painted. Repeat this with each color until the image is complete.
11. Assemble the circles as shown. Punch a hole for the eyelets on each side of the circle and attach the eyelets.
12. Assemble the Circle Cardstock and Magenta Strip onto the Green Cardstock.
13. Put a piece of ribbon through each eyelet and secure in back of the Green Cardstock. Attach to the card.

